Getting Started with Kubernetes
In this document, we will be learning about the basic components of kubernetes and how to create them.
Prerequisites
We need a hypervisor - install VirtualBox
https://www.virtualbox.org/wiki/Downloads
- This is something that we need inorder to run the nodes for our Kubernetes cluster, they can also be run on bare-metal, but since we will be running the nodes on our laptop, we will be running them on VMs.
Install kubectl
- k8s command line tool
- From: https://kubernetes.io/docs/tasks/tools/install-kubectl/#install-kubectl-on-macos
brew install kubectl
Install Minikube
- Minikube is a Lightweight tool that allows you to run K8s locally. It uses a VM, and deploys a simple cluster containing 1 node.
brew install minikube
minikube start --vm-driver=virtualbox
cleaning up:
minikube stop
delete local copy -
minikube delete
Cluster
Now, let us set up our Cluster.
(A cluster is a set of node machines for run for running containerised application. If you are running Kubernetes = you are running a cluster)
1. If you haven’t already, have VirtualBox running in the background.
Note: what happens if its not running? - it picks a default hypervisor that it can find on your machine, which sometimes, you cannot manage or view, or it will error out. So it’s better to have it running and set “—vm-driver” to use this.
2. Start up minikube, specify virtualbox as your VM driver
minikube start --vm-driver=virtualbox
- The above command
- downloads Minikube ISO
- sets up a local K8s environment via VirutalBox This creates a K8s cluster called “minikube”
Now have our cluster running.
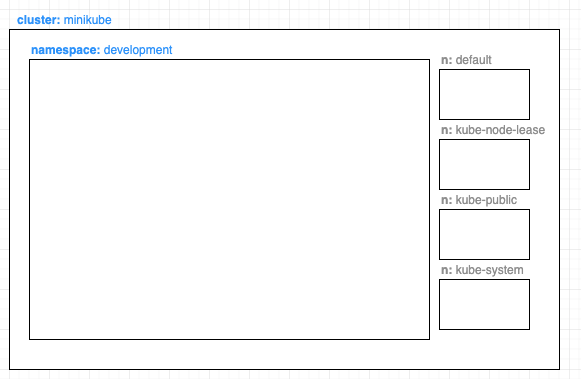
Namespaces
Namespaces are commonly used in large organisations, it provides a scope for Names (all objects in cluster must have Name and must be unique within the Namespace). It also provides a mechanism to attach authorisation and policy to that certain section of the cluster.
By default, k8s has the following namespaces: * default - default k8s cluster initiated at cluster creation * kube-node-lease - each node would have an associate Lease Object in this namespace. * lease object - a lightweight resource that improves the performance of node heartbeats when cluster scales * heartbeat - help determine the availability of a node * kube-public - mostly reserved for cluster usage in case some resources should be visible publicly throughout the whole cluster * kube-system - for objects created by k8s system
Creating a basic Namespace
---
apiVersion: v1
kind: Namespace
metadata:
  name: development
  labels:
     name: development
check:
kubectl get namespace
Now, we have a namespace called deployment in our cluster.
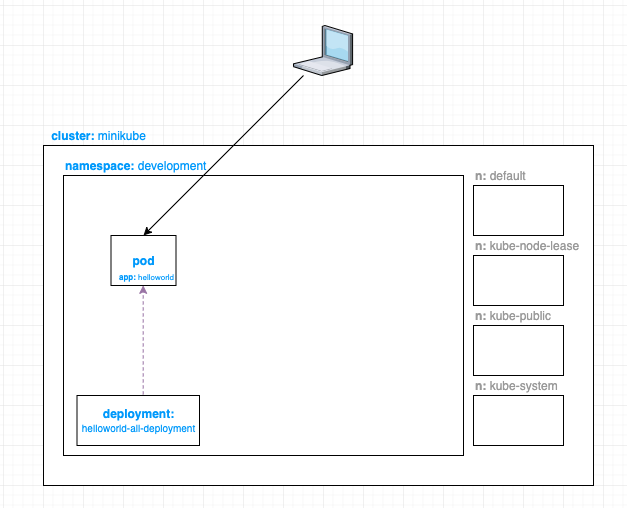
Deployment
Here is where you can describe the desired state of your app’s deployment. This gets read by the Deployment Controller which changes the actual state, to the desired state at a controlled rate.
Create a basic deployment.yaml
apiVersion: apps/v1
kind: Deployment
metadata:
  name: helloworld-all-deployment
  namespace: development #specify the namespace, otherwise it will be in default
spec:
  selector:
    matchLabels:
      app: helloworld
  replicas: 1 # tells deployment to run 1 pods matching the template
  template: # create pods using pod definition in this template
    metadata:
      labels:
        app: helloworld
    spec:
      containers:
        - name: helloworld
          image: karthequian/helloworld:latest
          ports:
            - containerPort: 80
In this yaml file, we are specifying that we want to run the karthequian/helloworld:latest image to 1 pod to inside our development namespace. We are opening up port 80 in our pod. The name of our deployment is helloworld-all-deployment.
karthequian/helloworld:latest is a simple nginx helloworld app for docker.
Create deplyment
kubectl apply -f deployment.yaml
Check your pods

Here we can see that we have one pod running in that deployment.
Now we have a deployment running inside our development namespace.
Service
Service is an abstract way to expose an application running on a set of Pods as a network service. You can access your deployment by exposing it as a service.
1. Create your basic service.yaml
apiVersion: v1
kind: Service
metadata:
  name: helloworld-all-service
  namespace: development #specify the namespace, otherwise it will be in default
spec:
  # if your cluster supports it, uncomment the following to automatically create
  # an external load-balanced IP for the frontend service.
  type: LoadBalancer
  ports:
    - port: 80
      protocol: TCP
      targetPort: 80
  selector:
    app: helloworld
2. Create Service
kubectl apply -f service.yaml
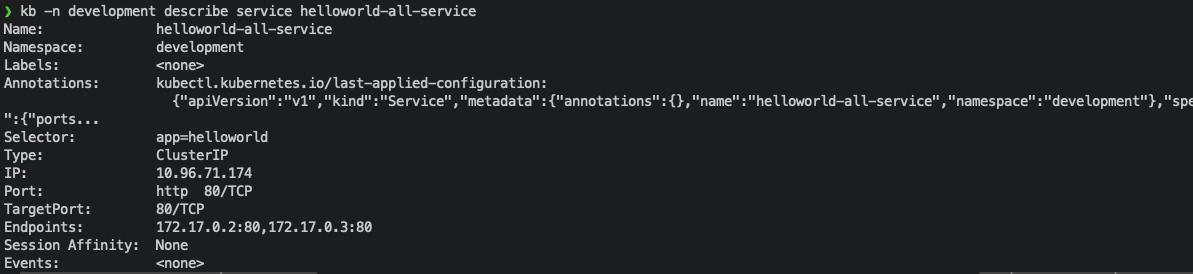
3. Check your service in the Cluster

4. Get the URL (to check on the browser):
kubectl -n development get service
take note of the port IP under PORT(S)
minikube ip

this equals to something like:
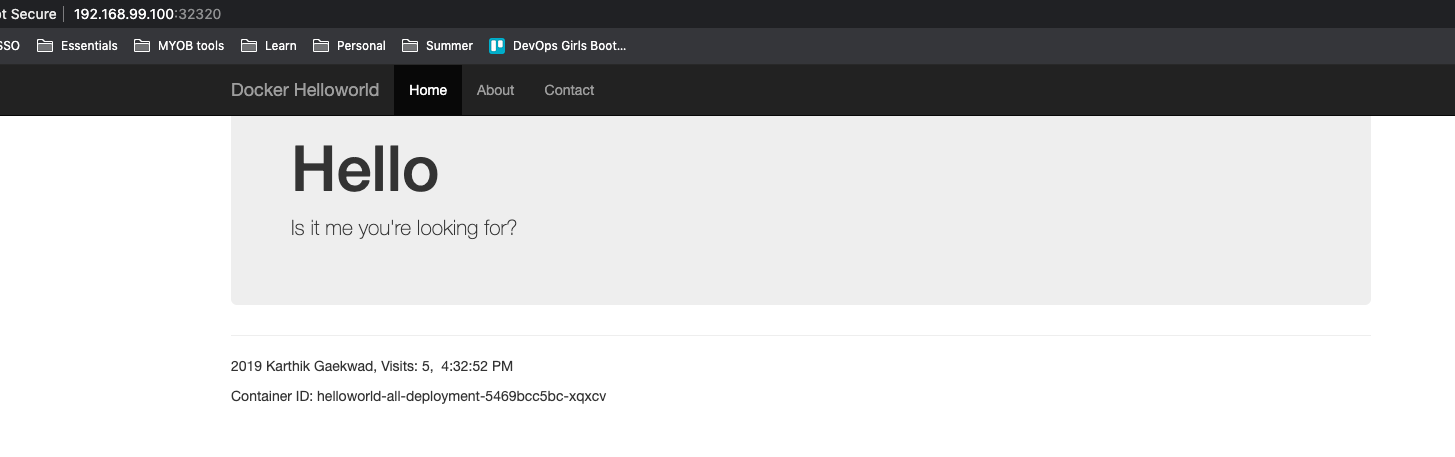
http://<minikube IP>:<port>

#in our case its -

http://192.168.99.100:32320
paste on browser
Load balancing using Service
Now, if I increase the replicas to two, the deployment will spin up another pod. The service would then load balance the traffic between the two pods.
1. Modify deplyment.yaml
apiVersion: apps/v1
kind: Deployment
metadata:
  name: helloworld-all-deployment
  namespace: development #specify the namespace, otherwise it will be in default
spec:
  selector:
    matchLabels:
      app: helloworld
  replicas: 2 # tells deployment to run 2 pods matching the template
  template: # create pods using pod definition in this template
    metadata:
      labels:
        app: helloworld
    spec:
      containers:
        - name: helloworld
          image: karthequian/helloworld:latest
          ports:
            - containerPort: 80
check:

Now we can see that we have two pods.
I opened up two browsers and hit the URL, and I can see that the traffic is being load balanced between the two pods:
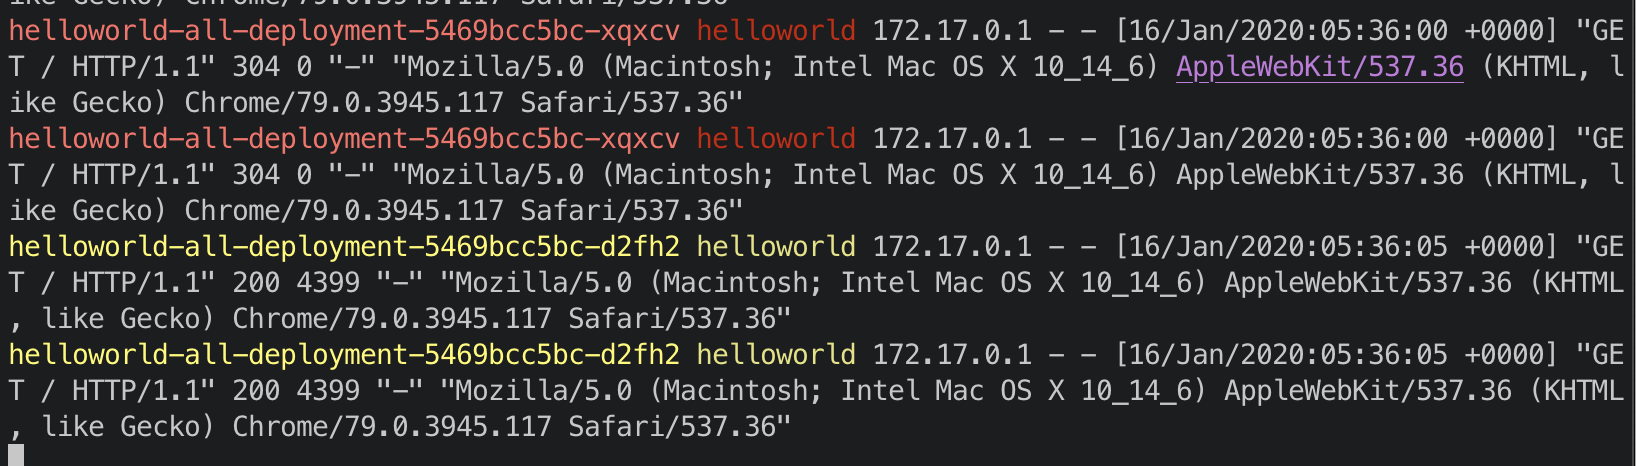
Note: to get the above logs, I used a tool called stern. It lets you track pod logs.
You can download it by doing brew install stern, then run
stern -n development helloworld-all-deployment
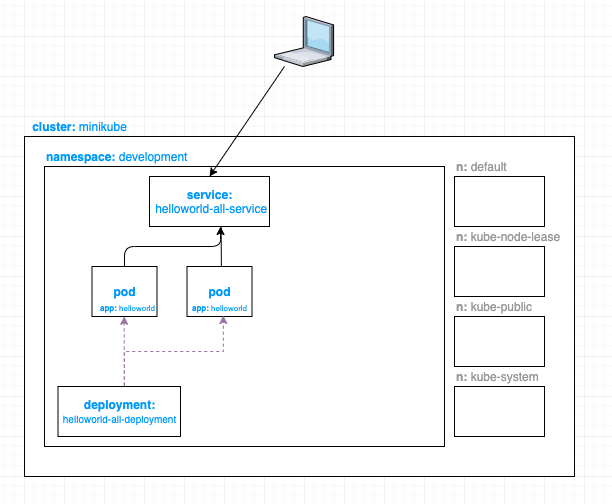
Now we have a service that sits in front of our pods inside our development namespace.
Horizontal Pod Autoscaler
HPA allows you to automatically scale the number of pods based on observed CPU utilisation.
In order for the hpa to work, we need to be able to see the usage metrics of our pods, we will need to enable metrics-server.
check your list of addons
minikube addons list
enable metrics-server
minikube addons enable metrics-server
For testing purposes, I’ve modified the deployment and scaled the number of pods (replica) I have to 1.
---
apiVersion: apps/v1
kind: Deployment
metadata:
  name: helloworld-all-deployment
  namespace: development #specify the namespace, otherwise it will be in default
spec:
  selector:
    matchLabels:
      app: helloworld
  replicas: 1 # tells deployment to run 1 pods matching the template
  template: # create pods using pod definition in this template
    metadata:
      labels:
        app: helloworld
    spec:
      containers:
        - name: helloworld
          image: karthequian/helloworld:latest
          ports:
            - containerPort: 80
Now I have one pod.

Then I created my hpa.yaml
---
apiVersion: autoscaling/v2beta2
kind: HorizontalPodAutoscaler
metadata:
  name: helloworld-hpa
  namespace: development
spec:
  scaleTargetRef:
    apiVersion: apps/v1
    kind: Deployment
    name: helloworld-all-deployment
  minReplicas: 2
  maxReplicas: 10
  metrics:
    - type: Resource
      resource:
        name: cpu
        target:
          type: Utilization
          averageUtilization: 70
    - type: Resource
      resource:
        name: memory
        target:
          type: Utilization
          averageUtilization: 75
kubectl apply -f hpa.yaml
Check:

- With this HPA, I am tracking my pod’s CPU usage and Memory usage
- I allow up to 75% CPU utilization or 75% memory utilization before I scale up another pod
- I set up my minimum pod to two and max to 10. This will make the deployment scale up another pod even though my initial deployment only initially scaled one.
check:

Now, let’s try putting some load on our server.
kubectl run --generator=run-pod/v1 -it --rm load-generator --image=busybox /bin/sh

Hit enter for command prompt

while true; do wget -q -O- http://http://192.168.99.100:32320; done
If we want to speed it up, we might want to edit our hpa to only tolerate a lower level CPU load before it scales up. So I reduced it to 10% just for testing purposes.

Enventually, we can see that it scaled some new pods

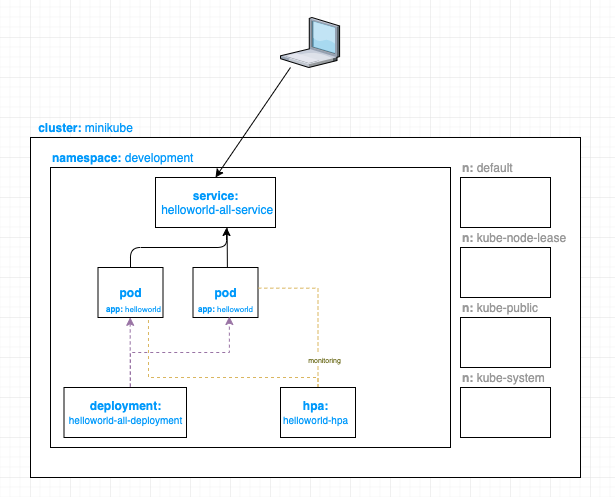
Note that all newly created pods automatically go behind our Service, this gives us some kind of load balancing in place.
This is because when the HPA decided to scale, it changes the replica number on the actual Deployment configuration of the pod and the service knows that it load balances anything that is created with this deployment.
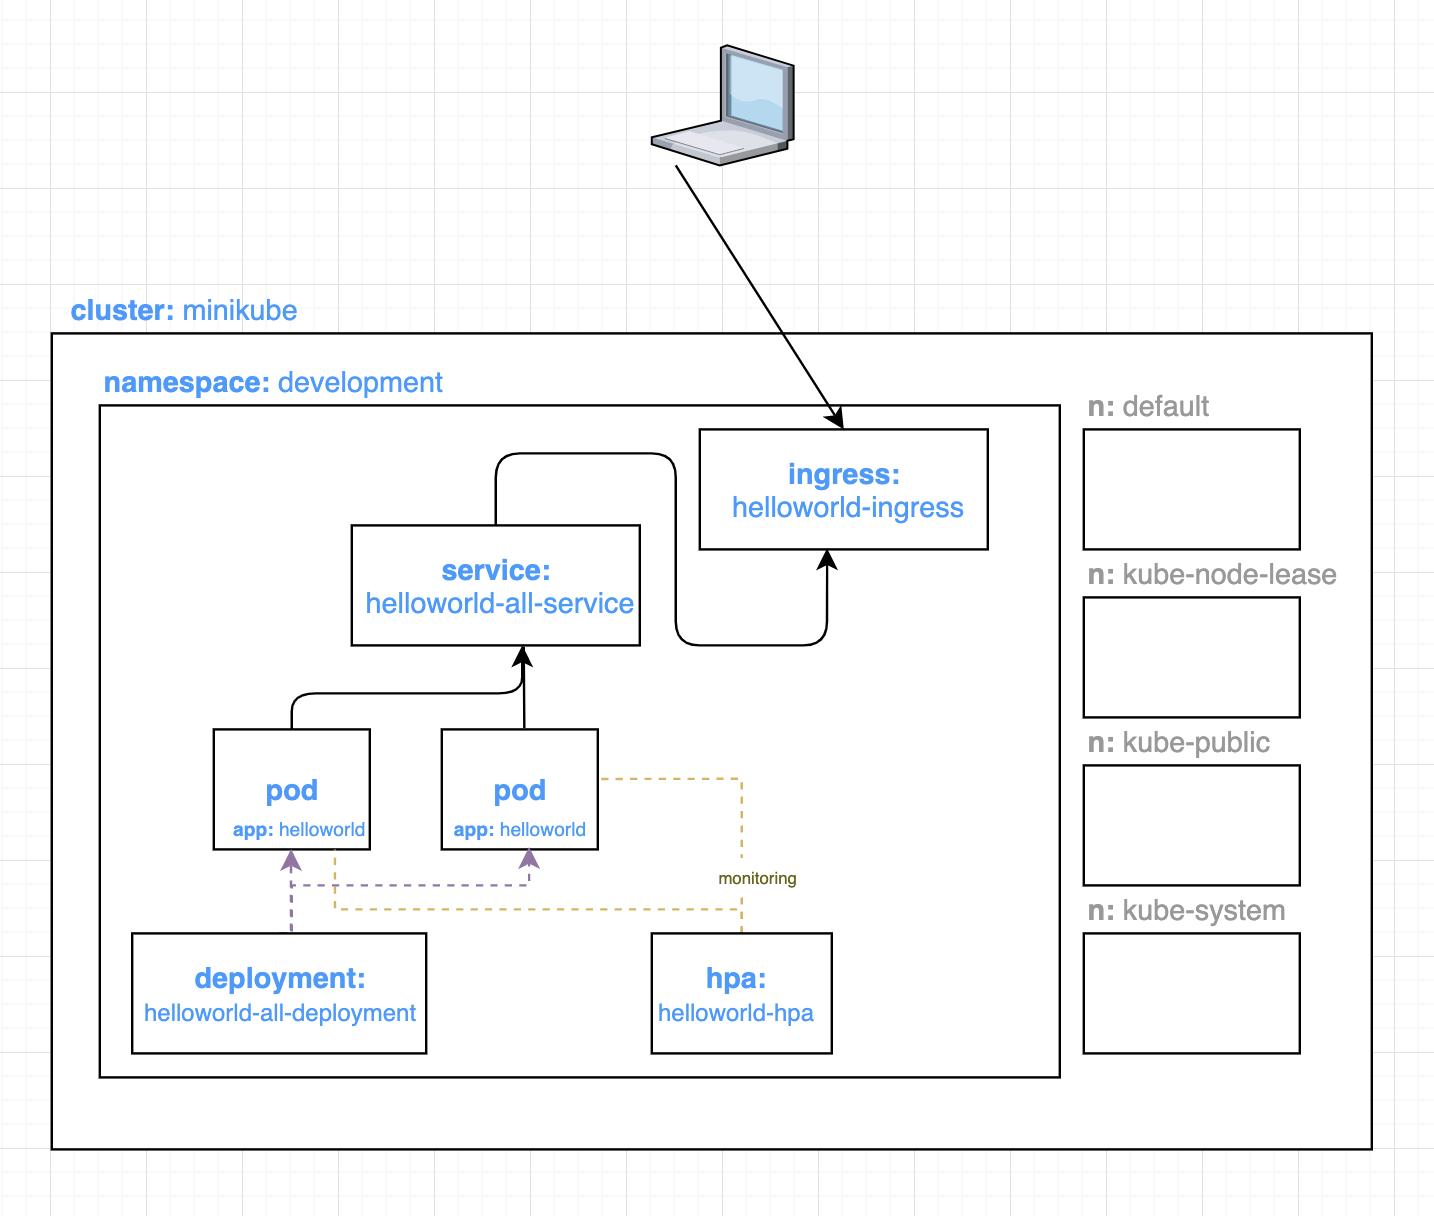
Now our architecture looks like:
Ingress
Ingress manages external access to the service, typically via HTTP. Allows you to expose HTTP and HTTPS routes from outside the cluster to services within the cluster. It adds an extra layer of routing and control.
Modify service.yaml
First we need to modify our service.yaml so that we don’t expose an external load balancer IP for it. I got rid of the “type: LoadBalancer”.
apiVersion: v1
kind: Service
metadata:
  name: helloworld-all-service
  namespace: development
spec:
  ports:
    - port: 80
      protocol: TCP
      targetPort: 80
      name: http
  selector:
    app: helloworld
before

after
Create ingress.yaml
apiVersion: networking.k8s.io/v1beta1
kind: Ingress
metadata:
  name: helloworld-ingress
  namespace: development
spec:
  rules:
    - host: mykube.com
      http:
        paths:
          - path: /
            backend:
              serviceName: helloworld-all-service
              servicePort: 80
I gave it a domain name mykube.com which points to my service helloworld-all-service.
Next, for testing purposes, because I haven’t actually bought the mykube.com domain, I’ve modified my /etc/hosts file to allow my laptop to recognise this domain, and have it point to my minikube cluster IP
192.168.99.100 mykube.com
note: as mentioned above, you can get your IP using minikube ip
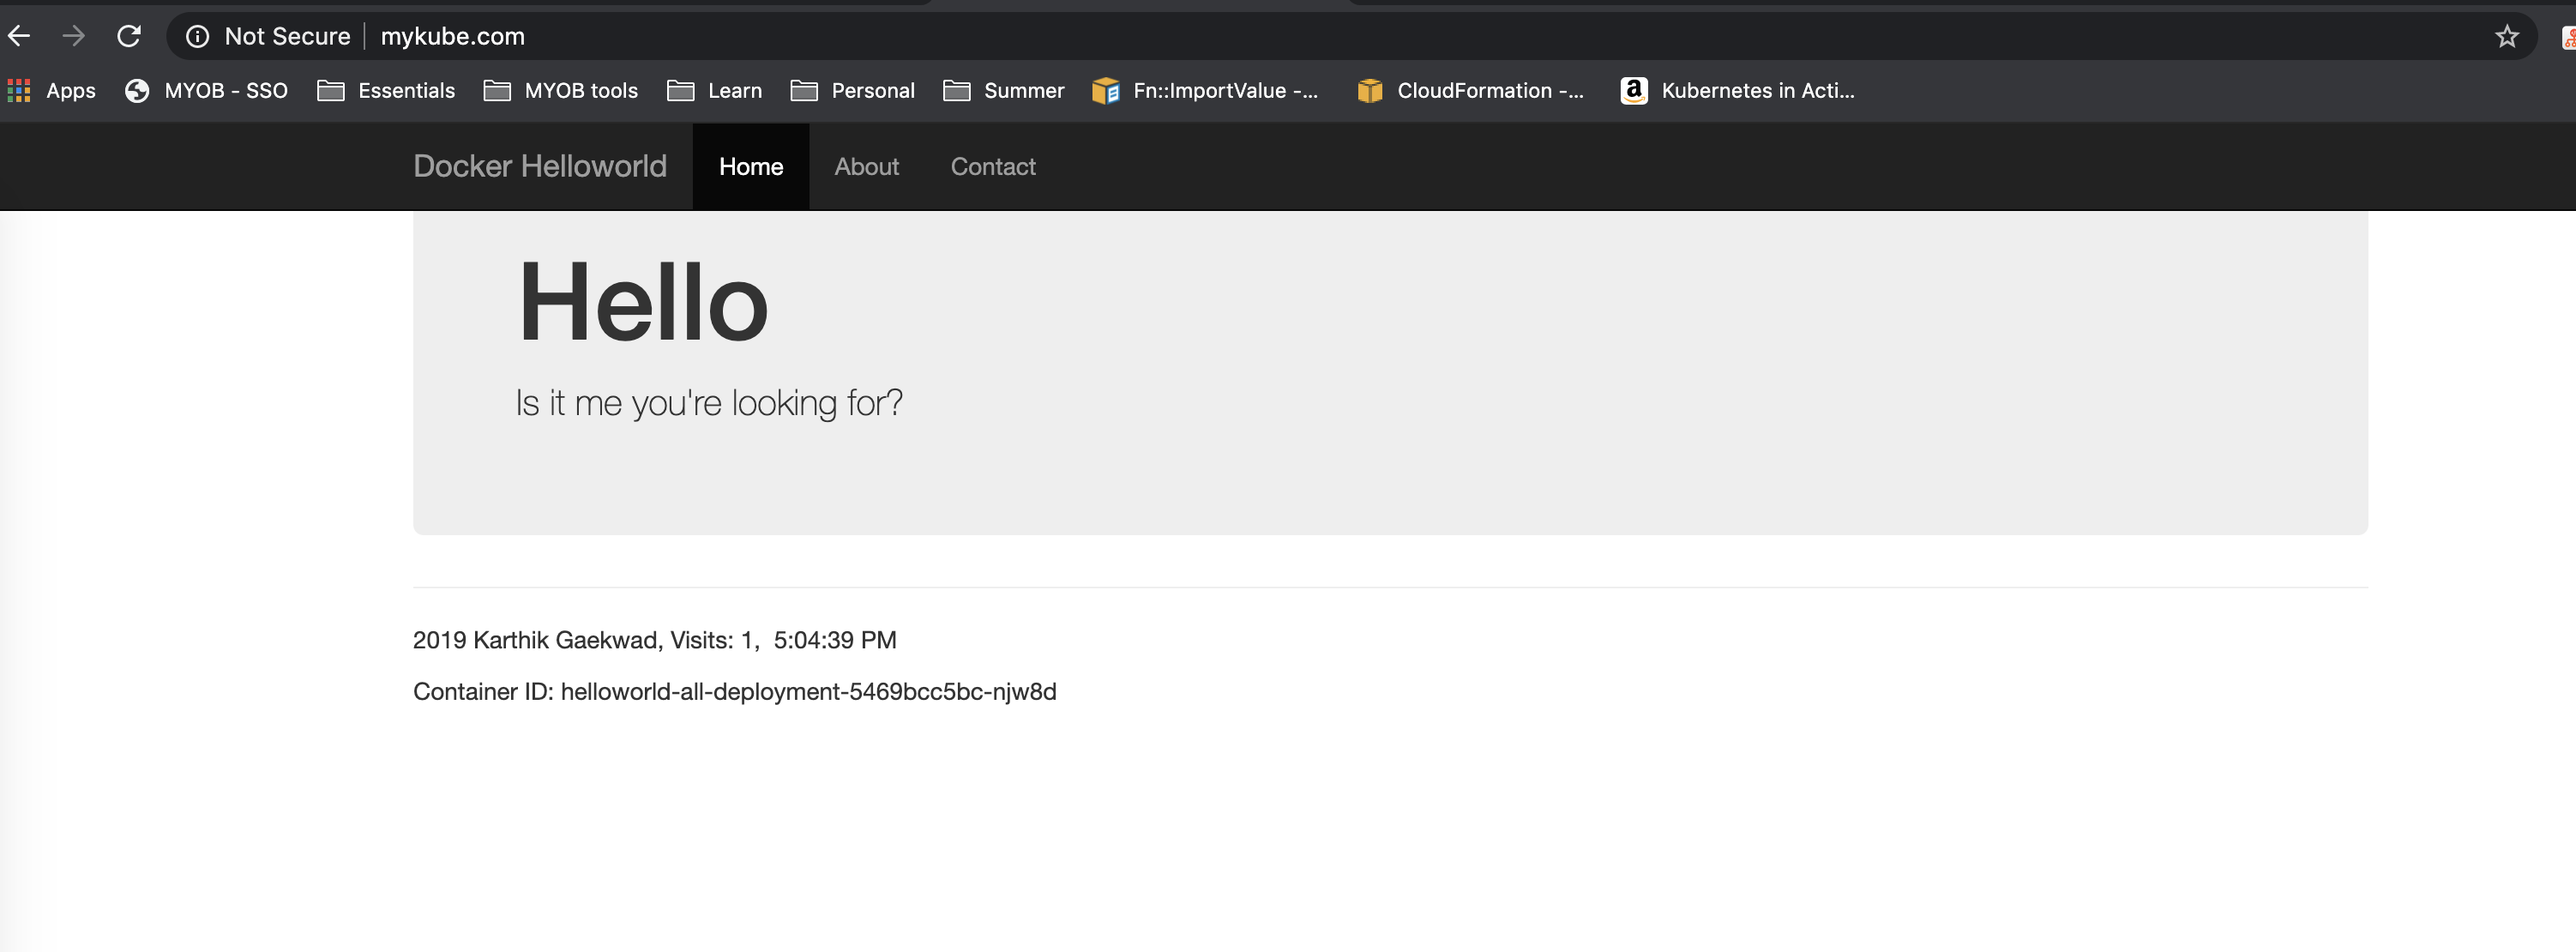
Now, if I go on my browser, and type mykube.com I should be able to see my website.
Our architecture then looks like: